When working on sloped roofs, ladder movement is a major safety risk. Improper setup, slippery surfaces, and unstable equipment can lead to accidents, injuries, or property damage. Here’s how to keep your ladder secure and safe:
- Set the Correct Angle: Follow the 4-to-1 rule – place the ladder base 1 foot away from the wall for every 4 feet of ladder height.
- Stabilize the Base: Use levelers, boards, or stakes to ensure the ladder is steady on uneven surfaces.
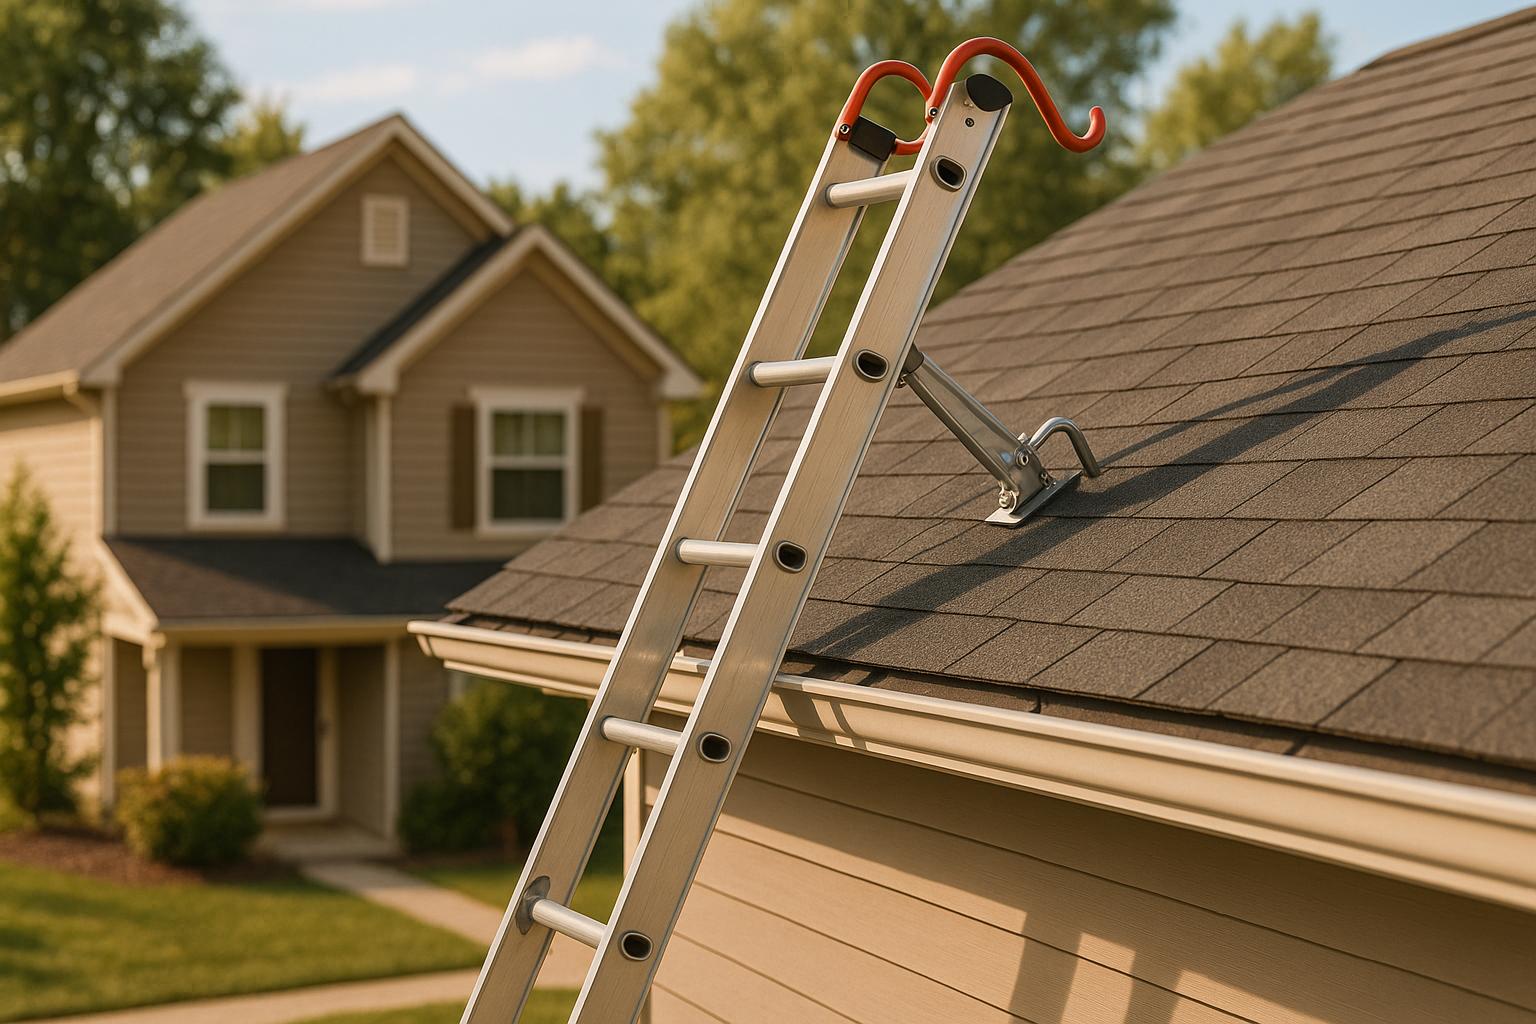
- Secure the Top: Attach roof hooks or standoff stabilizers to anchor the ladder to the roof.
- Use Non-Slip Features: Rubberized feet, pivot bases, and traction pads improve grip on slick surfaces.
- Wear Safety Gear: Use shoes with good traction, gloves, and a safety harness for added protection.
- Avoid Overreaching: Always keep your body centered between the ladder’s rails.
Rooftop safety how to work on a steep roof – with a hook ladder
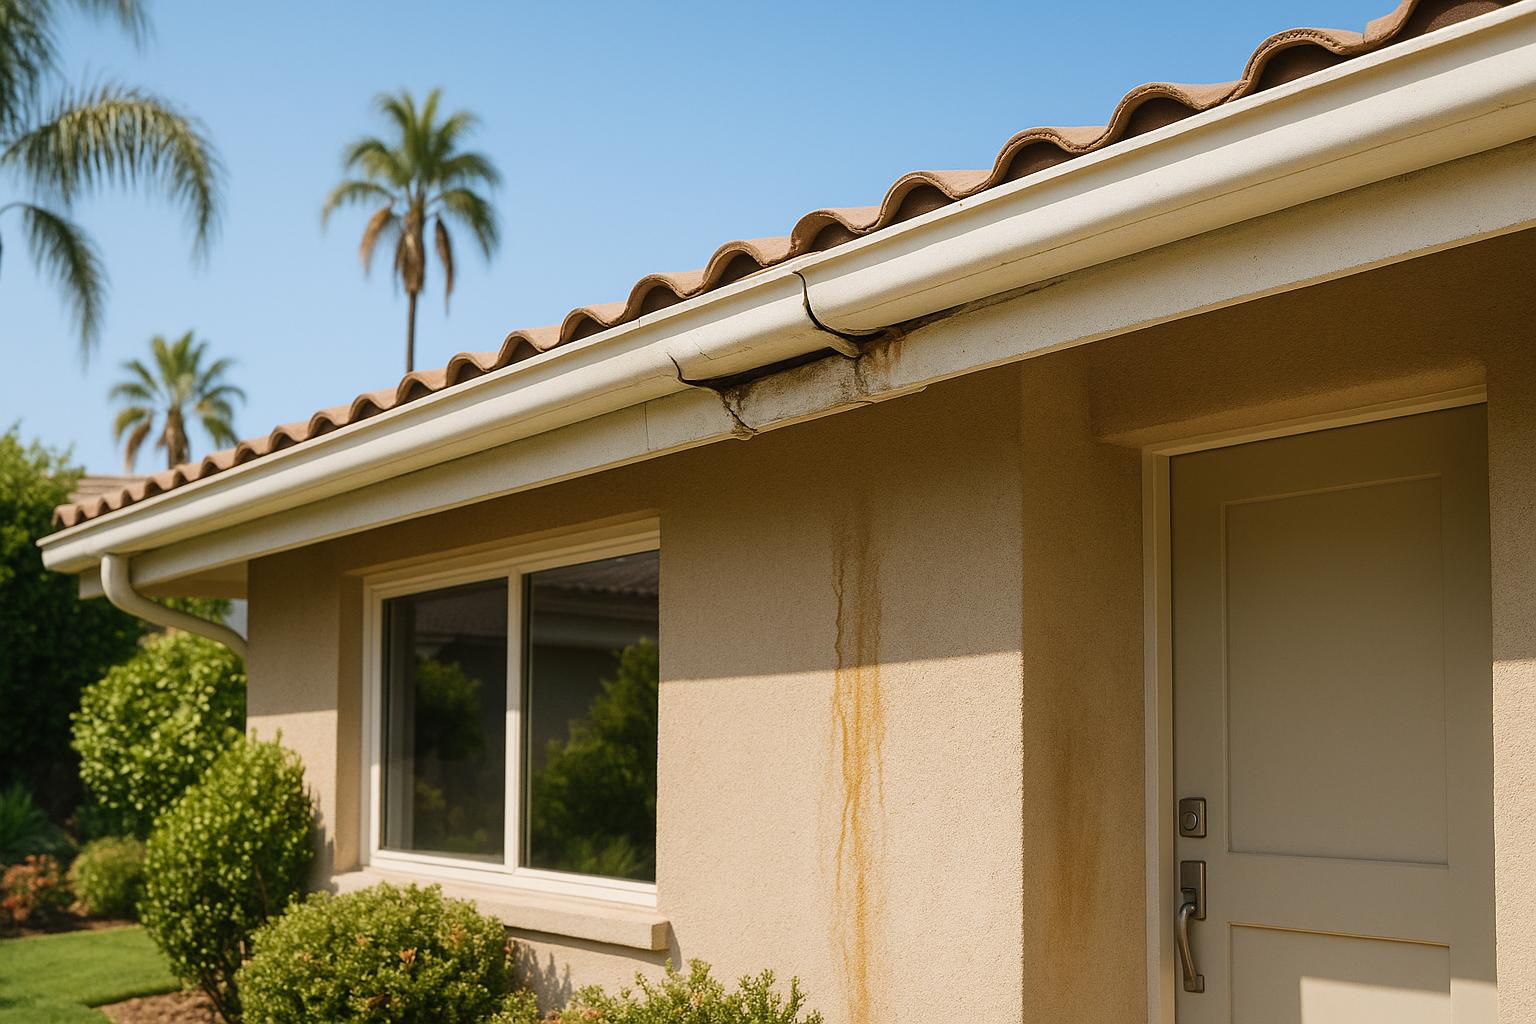
Risks of Ladder Movement on Sloped Roofs
Working on sloped roofs comes with a unique set of challenges that can turn routine tasks into serious safety hazards. The incline of these surfaces increases the likelihood of accidents, making ladder movement especially risky for both workers and the property itself.
Dangers Specific to Sloped Roofs
The angle of a sloped roof fundamentally affects how ladders perform. Gravity shifts the weight toward the lower edge, which can cause the base of the ladder to slide while the top pushes sideways. This instability makes sloped surfaces particularly hazardous, as a poorly set-up ladder is more likely to slip, tilt, or even collapse. Ensuring the proper ladder angle and leveling is critical to maintaining stability on these surfaces.
One of the most dangerous moments is transitioning between the ladder and the roof. Slips or a loss of balance during this step are leading causes of falls.
On top of these inherent risks, environmental conditions often make the situation worse.
Weather and Surface Conditions
Weather can quickly turn a manageable task into a dangerous one. Rain, snow, ice, and wind all create additional hazards when using ladders on sloped roofs. For instance, wind is particularly dangerous because its force increases exponentially with speed. A 20 mph wind exerts about four times the force of a 10 mph wind.
Slippery surfaces caused by rain, snow, or ice further reduce traction. Shingles, metal roofs, and even ladder rungs can become dangerously slick when wet. A thin layer of ice is enough to eliminate grip entirely, and on an incline, this can lead to severe instability. While clean, dry surfaces offer the best traction and stability, waiting for ideal conditions isn’t always an option, especially during emergencies or time-sensitive repairs.
Roof Weight Limits
Weight distribution is another critical factor when working on sloped roofs. The angle of the roof changes how weight is spread, which can strain both the ladder and the roof itself. Overloading a ladder increases the risk of failure and injury. Most ladders are rated for a maximum load of 375 pounds under ideal, flat conditions. However, on a sloped roof, additional stresses can lower this safe limit. Carrying heavy roofing materials can quickly approach or exceed these limits.
Roof structures also have their own weight limitations. Concentrating too much weight in a small area – like the edge of a roof – can cause structural damage or even localized collapse. This is especially true for older homes or those with weakened roofing systems. OSHA frequently cites ladder safety violations during roofing inspections, highlighting the importance of adhering to weight limits and proper setup.
Paying attention to these weight concerns is essential to protect both workers and the roof itself.
Tools and Equipment for Securing Ladders
When working on sloped roofs, having the right tools to secure your ladder is crucial for safety and stability. There are specialized tools designed to improve grip, create stable bases, and anchor ladders securely. Below, we’ll break down some of the most effective tools and materials available for enhancing ladder stability on sloped roofs.
Non-Slip Ladder Attachments
Rubberized ladder feet are a simple yet effective upgrade. These attachments replace standard ladder feet, offering a much stronger grip on slippery or uneven surfaces.
Pivot bases and adjustable feet are designed to keep your ladder level, even on uneven ground. These features help maintain the correct ladder angle, which is especially important when working on slopes.
Industrial-grade roof hooks attach the top of the ladder to the roof itself, preventing backward sliding. These hooks distribute weight evenly across multiple roof sections, reducing stress on any single point. A standout example is the Ladder-Max standoff stabilizer, which is both OSHA certified and ANSI tested for direct roof placement.
"The Ladder-Max is the only standoff stabilizer on the market that is both OSHA certified and ANSI tested for direct roof placement." – Ladder-Max LLC
In 2024, Mark Carter relied on a Ladder-Max stand-off to stabilize his ladder while working on a 25×30 metal garage roof. The stabilizer kept the ladder secure above the overhang.
Ladder stabilizers or standoff brackets are another must-have. These devices prevent side-to-side movement and protect gutters from damage. By extending the ladder’s contact points, they create a more stable setup, especially near roof edges where balance is critical.
Recommended Ladder Materials
Fiberglass ladders are a solid choice for roof work. Unlike aluminum ladders, fiberglass doesn’t conduct electricity, making it a safer option if there’s a risk of contact with power lines. They also hold up better against weather and corrosion.
Adjustable ladders with reinforced rubberized feet are ideal for sloped roofs. These ladders can be adjusted to match different angles while maintaining stability. The reinforced feet provide superior grip, reducing the risk of slipping on various roofing materials.
Extension ladders are often the go-to for roof access. They allow for proper angling and can be secured at both the base and the top. Always choose an extension ladder with a weight rating that exceeds your needs, as sloped surfaces add extra stress.
Safety Gear for Roof Work
Having secure ladder components is just one piece of the puzzle. Proper safety gear is equally important when working on roofs.
Footwear with good traction is critical. Shoes with deep treads and flexible soles offer better grip on ladders and roof surfaces. Avoid smooth-soled boots or shoes with worn treads, as they can become dangerously slippery, especially when wet.
Work gloves are another essential. They improve your grip on ladder rungs and roofing materials. Look for gloves that fit snugly but still allow you to handle tools comfortably.
Personal fall protection equipment, like safety harnesses, is mandatory when working at heights where a fall of six feet or more is possible. While a harness won’t replace proper ladder setup, it adds an extra layer of safety.
Tool belts are invaluable for carrying materials while keeping your hands free. This allows you to maintain three points of contact while climbing, reducing the risk of falls.
Traction enhancers, such as slip-resistant ladder shoes or pads placed under the ladder rails, are particularly helpful on smooth surfaces like concrete, tile, or metal. They’re also useful for wet shingles or metal roofing, where regular ladder feet might struggle to maintain grip.
How to Set Up a Ladder on a Sloped Roof
Setting up a ladder on a sloped roof requires careful attention to the angle, a stable base, and secure anchoring. While uneven surfaces can make the process trickier, using proven techniques can help ensure your safety when accessing the roof.
The 4-to-1 Rule for Ladder Angle
The 4-to-1 rule is a cornerstone of ladder safety. This rule advises that for every four feet of ladder height, the base should be placed one foot away from the wall or structure. This creates an ideal angle of about 75°, as recommended by the Health and Safety Executive (HSE).
"For every four feet of height you need to climb, place the base of the ladder one foot away from the wall the ladder is leaning against." – Health and Safety Executive (HSE)
Interestingly, a 2016 study found that only 1% of cable installers in the U.S. positioned their ladders correctly, with many opting for a steeper angle closer to 67°.
To follow this rule, measure the height you need to reach and place the ladder base at one-fourth of that distance from the wall. A quick way to check the angle is to stand with your feet at the ladder’s base and extend an arm forward. If the ladder is positioned correctly, you should be able to touch the rungs at shoulder height.
Once the angle is set, the next step is ensuring the ladder base is stable.
Positioning the Ladder Base
The ladder base should rest on a flat, stable surface. If the ground is uneven, you can use tools like levelers, boards, or shims to create a stable foundation .
Ladder levelers are particularly useful – they are attachments that adjust the height of individual ladder feet to accommodate sloped or uneven ground. If you don’t have levelers, a sturdy board or piece of plywood can work as a makeshift base. For extra security, drive stakes into the ground on either side of the board and behind each ladder foot to prevent slipping.
In cases of minor unevenness, you can dig into the higher side of the ground to level it out or use wood shims under the shorter foot. These adjustments help ensure the ladder remains steady on various surfaces.
Once the base is stable, securing the ladder becomes the final step.
Securing the Ladder
After positioning the ladder, anchoring it is crucial to prevent movement during use. Use industrial roof hooks and lashing straps to secure the ladder’s top and base. For extra stability, anchor the base with wooden stakes or rebar to prevent backward movement.
For additional support, you can attach outrigger stabilizer bars to the sides of the ladder base. These bars help counter tipping forces. Another option is a pivoting ladder base, which automatically adjusts to ensure both legs maintain even contact with the ground.
For frequent or permanent roof access, some professionals install molded boot mounts along the roof ridge. These mounts cradle the ladder feet securely, eliminating the need to reposition the ladder each time.
Lastly, having a helper stationed at the base to monitor stability can provide an extra layer of safety.
sbb-itb-d1d6490
Methods to Prevent Ladder Movement
When working on sloped roofs, ensuring your ladder stays secure is critical for safety. While proper setup and positioning are essential, there are additional tools and techniques that can significantly enhance ladder stability. At Prime American Roofing, we prioritize your safety, and the following methods are designed to add extra layers of protection against unwanted ladder movement.
Using Ladder Stabilizers and Roof Hooks
Ladder stabilizers are fantastic for preventing tipping and sliding. These attachments widen the ladder’s base, distributing weight more evenly across the roof. For example, the Ladder-Max Stand-Off Stabilizer ($99.95) extends the ladder’s reach while keeping it clear of gutters. Similarly, Roof Zone Ladder Hooks with Wheels ($59.95–$94.55) anchor the ladder securely to the roof’s peak, preventing slippage while making repositioning easier thanks to their built-in wheels.
Roof hooks are another great option for securing the ladder to the roof ridge. These devices anchor firmly to the ridge, ensuring the ladder stays in place. Many models, like the Roof Zone hooks, also include wheels for added convenience when moving the ladder.
"The ladder shall be secured at its top to a rigid support that will not deflect." – OSHA regulation 1926.1053(b)
For a more comprehensive solution, consider the Roof Zone Ladder Stabilizer ($114.95), which combines multiple stabilization features into one system. Customer Huy Le praised the Ladder Stability Anchor, Ultimate Ladder Safety Kit in July 2024, giving it a 5-star rating and noting that the "anchor clamp felt very sturdy and reliable, providing a feeling of safety while using a ladder."
Don’t forget to inspect your equipment regularly. Check mounting points, straps, and hardware before every use to ensure everything is secure and free from wear.
Ground Anchors and Cleats
To keep the ladder base steady, anchoring solutions are a must. Ground anchors are especially useful for soft or uneven terrain, preventing backward sliding. On soft ground, placing a piece of plywood or a sturdy board under the ladder’s feet and securing it with stakes can create a stable foundation.
For hard surfaces, 2×4 cleats are an effective alternative. By screwing these wooden pieces on either side of the ladder’s feet, you create barriers that prevent sliding.
On sloped ground, ladder levelers can help by allowing you to adjust the length of each leg, ensuring both feet remain firmly in contact with the surface. To limit horizontal movement, ladder leashes are another handy tool. Simply wrap a leash around one ladder leg and secure it to a fixed point, keeping the ladder steady while still allowing normal climbing.
Spotters for Additional Safety
While equipment plays a big role, having a helper act as a spotter adds an extra layer of safety. A spotter stationed at the base of the ladder can monitor stability, watch for shifting, and provide immediate assistance if needed. The spotter should stand facing the ladder, gripping the side rails near the base with both hands, applying steady downward and inward pressure.
In addition to stabilizing the ladder, a spotter can alert the climber to sudden changes, like wind gusts or ground-level hazards, and even pass up tools, reducing the need to carry items while climbing. Customer Pedro Martinez highlighted the importance of these safety systems in a July 2025 review of the Ladder Stability Anchor, Ultimate Ladder Safety Kit, calling it essential for roof work and painting at height.
The Ultimate Ladder Safety Kit, priced at $43.99 for Prime members (regularly $49.99), combines multiple securing methods and has earned a 4.4/5 star rating from 25 customers. By using both mechanical tools and human oversight, you can ensure your ladder remains stable and secure, making roof work much safer.
Safe Practices for Roof Work and Ladder Use
Even with the best equipment, staying safe on a roof requires more than just tools – it’s about practicing smart, reliable habits every time you climb. Your safety starts with following time-tested techniques when using a ladder.
Maintain Three-Point Contact
One of the most important safety rules for ladder use is the three-point contact rule. This means you should always have two hands and one foot or two feet and one hand on the ladder at all times. This simple practice significantly reduces the chance of slipping or falling. Take your time when climbing, and make sure you’re maintaining these three points of contact before reaching for tools or adjusting your position.
To stay steady, always face the ladder as you climb. This gives you better control and balance, lowering your risk of falling. Also, check that your footwear is clean and dry to ensure good grip while climbing. Lastly, position your body carefully – shifting your weight too much can throw off your balance.
Avoid Overreaching
Even when you’re in a hurry, never overreach while working on a ladder. Stretching too far to the side can shift your center of gravity and cause the ladder to tip over. To stay safe, keep your upper body centered between the ladder’s rails and avoid leaning beyond its sides. A good rule of thumb is to keep your waist within the rails at all times. If something is out of reach, climb down and reposition the ladder instead of risking a fall.
Keep the Work Area Clear
A messy work area can quickly turn into a hazard. Keep the ground around the ladder free of tools, debris, and other materials that could cause you to trip or lose focus. When climbing, use a tool belt or a hoist to carry tools and supplies. This way, your hands stay free to maintain a solid grip on the ladder, keeping you safer as you work.
Conclusion: Securing Ladders for Safe Roof Work
Working on sloped roofs requires careful planning, reliable equipment, and a commitment to safety. Statistics make it clear: properly securing your ladder is one of the most effective ways to prevent accidents and save lives.
Safe roof work starts with recognizing the unique challenges of sloped surfaces. Factors like weather conditions, roofing materials, and weight limits all influence how to approach the job. Tools such as rubberized ladder feet, pivot bases, and industrial roof hooks can provide the stability you need to work confidently and securely.
Getting the setup right is crucial. Always check the roof’s load capacity, position the ladder at the correct angle, and extend it at least 3 feet above the roof’s edge. Anchoring systems, like roof hooks and ladder leash systems, offer an extra layer of security, minimizing the risk of movement when stability matters most.
Additional safety measures, including stabilizers, ground anchors, and spotters, can enhance your protection. Paired with essential practices like maintaining three-point contact and avoiding overreaching, these methods form a comprehensive approach to ladder safety that professionals rely on. Together, these precautions address the specific dangers of sloped roofs, protecting both workers and property.
Every time you step onto a ladder, you’re making a decision about your safety and the safety of others. The steps outlined here aren’t just recommendations – they’re critical safeguards. Take the time to set up properly and follow these guidelines. No task is worth compromising your well-being.
For expert advice and top-tier roofing services in Southern California, visit Prime American Roofing at https://primeamericanroofing.com.
FAQs
What are the best tools to keep a ladder stable on a sloped roof?
To keep your ladder steady on a sloped roof, you can rely on tools like ladder stabilizers, roof brackets, and ladder levelers. These tools are specifically made to improve stability and lower the chances of accidents when working on uneven surfaces.
- Ladder stabilizers: These attach to the top of your ladder, offering a wider point of contact to prevent it from tipping sideways.
- Roof brackets: These can be installed to create a solid platform for your ladder to rest on.
- Ladder levelers: These adjust the legs of your ladder to handle uneven ground or sloped surfaces effectively.
Make sure to follow safety guidelines and carefully inspect your equipment before starting any work. A secure setup is key to staying safe.
How do rain and wind impact ladder safety on sloped roofs?
Rain and wind pose serious risks when working with ladders on sloped roofs. Rain makes surfaces slick, turning both the roof and ladder into potential hazards for slips and falls. Wind, on the other hand, can cause the ladder to wobble or even tip over, especially on steeper slopes, creating dangerous conditions for anyone working at height.
To minimize these risks, always check the weather forecast before starting any roof-related tasks. If rain or strong winds are expected, it’s best to postpone the work. Taking these precautions can help ensure a safer and more stable working environment.
What safety equipment should you use to stay secure while working on a sloped roof?
When working on sloped roofs, safety should always be your top priority, and using the right safety gear is non-negotiable. Start with a personal fall arrest system, which includes a body harness and lanyard, paired with roof anchors to keep you securely in place. It’s equally important to wear slip-resistant footwear – options like shoe cleats or roof wedges can help you maintain steady footing. If you’re working on metal roofs, consider magnetic boots for added grip. The goal is simple: equip yourself with tools that reduce the risk of falls and ensure you stay secure in even the toughest conditions.